Lock / Unlock Files
#
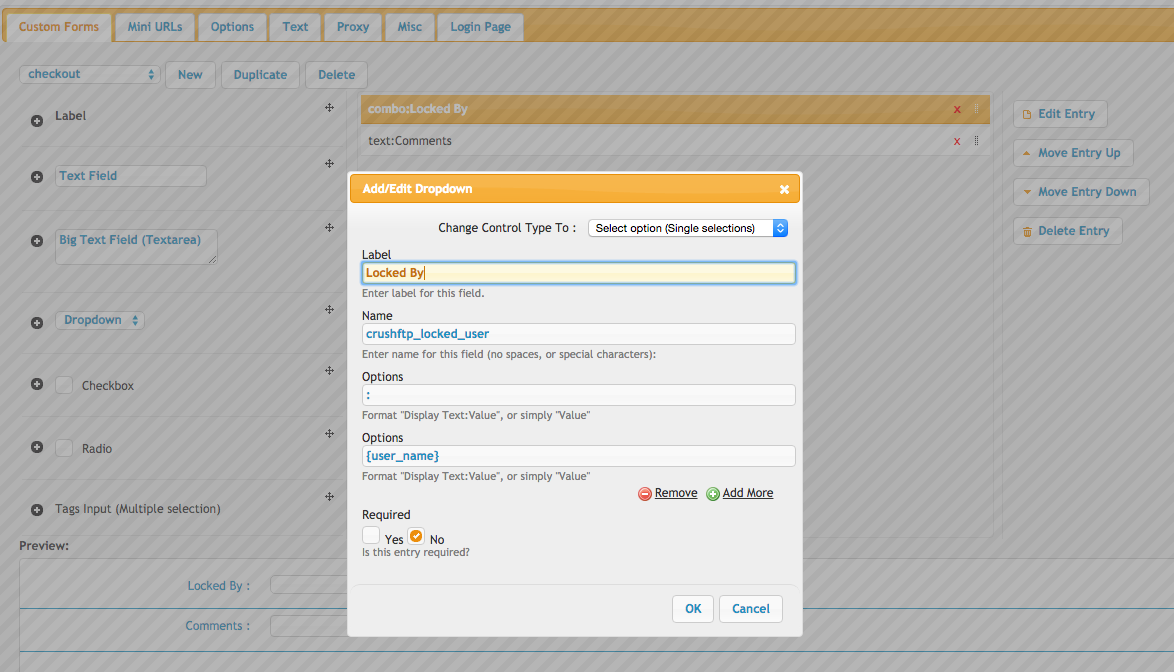
In the preferences, WebInterface, you can create a custom form in our example is checkout. You can have additional fields, but the critical item is a combobox with the specific name "crushftp_locked_user" as this is what is specifically tied to locking, But we give you freedom to design other aspects of the form. You should have two values in this combobox...a blank top one, and a second one with {user_name}.

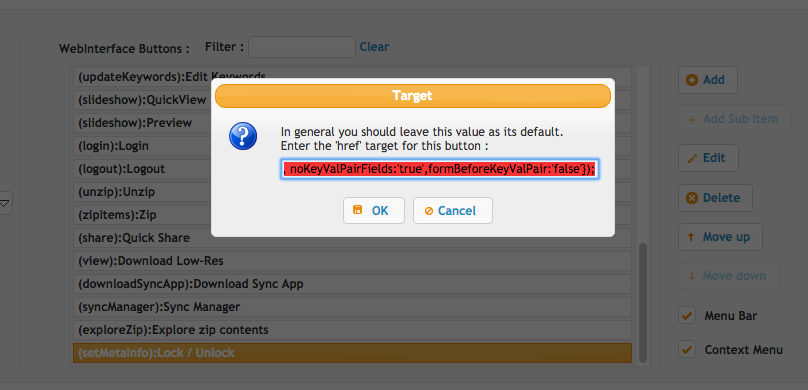
Next, in the User Manager, WebInterface section, buttons section, you add a button for "Set Meta Property" and use a name like "Lock / Unlock". It will pre-populate the command, but adjust it to something like:
javascript:setMetaInfo({customFormToUse:'checkout', noKeyValPairFields:'true', formBeforeKeyValPair:'false'});

The word "checkout" here refers to the name of the form you created in the prefs. Now you have your form to display, and its attached to a button action.
The last aspect is optional, but you may want to display the currently locked user in another column in the WebInterface. For this, in the User Manager, WebInterface section, customizations...filter on 'meta'. Then fill in the three fields with something like: (Where 5 is the column number to use for this info.)
For this to work you need to edit the prefs.XML file form the CrushFTP folder and set the <exif_listings> to be true. You will also need to create the form and edit the prefs.XML on the DMZ instance as well if you have a DMZ.

Add new attachment
Only authorized users are allowed to upload new attachments.
List of attachments
| Kind | Attachment Name | Size | Version | Date Modified | Author | Change note |
|---|---|---|---|---|---|---|
png |
checkout_form.png | 160.3 kB | 1 | 25-Oct-2018 04:31 | Ben Spink | |
png |
lock_unlock.png | 84.9 kB | 1 | 25-Oct-2018 04:31 | Ben Spink | |
png |
meta.png | 95.9 kB | 1 | 25-Oct-2018 04:31 | Ben Spink | |
jpg |
testlock_demo.jpg | 219.0 kB | 1 | 11-Aug-2020 11:01 | Ada Csaba |
«
This particular version was published on 25-Oct-2018 04:31 by Halmágyi Árpád.
G’day (anonymous guest)
Log in
JSPWiki
